If you remember the 70s, you probably remember the wildly popular ‘Macrame’ phase. Everybody was knotting rope, and the plant-hangers, wall-hangings, and owls (!!!) were everywhere.


If you miss the knotted beauties (yes, I do think they’re quite pretty…well, most of them – I did see some doozies 😝 ) ….good news! It’s making a comeback.
While some crafters got a bit carried away ~ I’m still on the fence about this one 😊 What do you think? ~

I think we’ll start with ‘simple’.

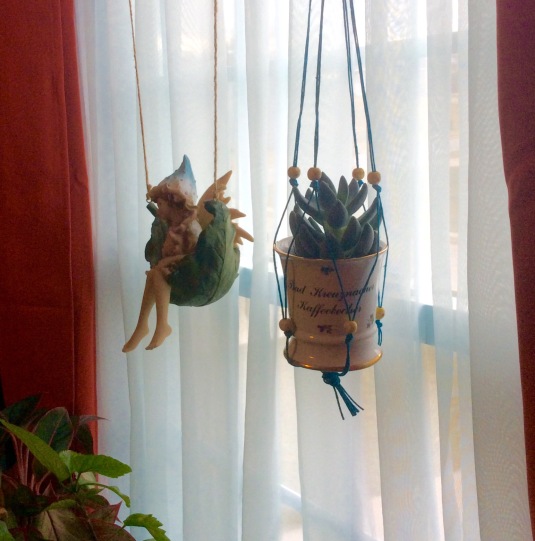
This little plant-hanger is easy to make, and with the lengths of the rope/hemp you can adjust it to any size pot.
I want to show off one of my favorite coffee cups, so I made a small version. If you have a bigger pot, just make the rope/hemp strands longer.
Alright….let’s begin
You’ll need
~ 4 strands rope/hemp , 65″ long ~ I like to use hemp. It’s easy to come by, comes in pretty colors, and is not stretchy!
~ 8 wood beads (optional)
~ 1 metal ring
~ 1. Double all 4 strands, and thread the loop through the ring.

~2. Take all 8 ends, thread them through the loop, and pull tight


~3. Separate the strands into pairs, thread a wood bead on each pair (optional – if you don’t like beads just skip this step), and knot the strands – with an overhand knot – about 12″ from the ring. Push down the beads.

~4. Lay everything flat on the table, and pair the strands, using one each from neighboring duos. Add more beads.
~5. Knot the new pairs about 4″ from the other knot.
Knot all 8 strands together, 4″ down, forming an overhand knot.

Pick your favorite cup, add a plant, and hang your Macrame beauty in the window.
Before I leave you to get crafty – 2 tips
-Since the cup doesn’t have a drainage hole, you wanna set a potted plant in there. Otherwise it might not make it. 😢
-The easiest way to set your cup/pot into the hanger – trial and error experience 😋 – set your pot upside down, place the large knot on the pot, and arrange the strands around it. No tilts, no tangles, no shards! 😍
I do wanna learn more about this ‘revived’ craft ~ as I do I will share my newfound knowledge with you!
I hope you have fun, and will share your piece with me.
I hope to see you soon! 💕


Mar 23, 2017 @ 20:55:15
Great tutorial, I love this…so simple..yet pretty!•.¸¸♥♥ ¸¸.• I may borrow this one, if that’s okay. I don’t have any macrame on mine ;(
LikeLiked by 1 person
Mar 24, 2017 @ 14:20:10
Of course….borrow away 😁I’m glad you like it. I have two in my kitchen window. Since I have no window sills they are the perfect solution.
LikeLiked by 1 person
Mar 24, 2017 @ 18:01:01
•.¸¸♥♥ ¸¸.• Thank you!
LikeLike
Mar 24, 2017 @ 14:58:46
Reblogged this on kelleysdiy and commented:
Want to learn to macrame? This tutorial shows you how. Thank you Kristabella’s Hodgepodge
LikeLiked by 1 person
Mar 24, 2017 @ 16:32:31
That’s awesome 🤗 Thank you!
I’m sorry I reblogged your ‘Bathroom plant post’ without asking 😔 won’t happen again!
LikeLiked by 1 person
Mar 24, 2017 @ 16:54:39
Don’t worry about it. wordpress lets you know when someone reblogged. I don’t mind at all. no worries.
LikeLiked by 1 person
Mar 26, 2017 @ 23:54:53
over 63 likes so far on this craft you made! Thank you for letting me reblog!
LikeLiked by 1 person
Mar 27, 2017 @ 12:43:32
Woohoo 🙆🏻 That’s awesome, Kelley! Feel free to ‘reuse’ anything, anytime 😎
LikeLiked by 1 person
Mar 27, 2017 @ 17:07:30
Same goes to you!!! Everyone loved your post!
LikeLiked by 1 person
Mar 27, 2017 @ 17:08:22
One comment: Beautiful what an amazing art!
LikeLiked by 1 person
Mar 27, 2017 @ 17:15:31
Eeek! 😀 Thanks for telling me 😍
LikeLiked by 1 person
Mar 27, 2017 @ 17:18:26
Check out your blog on my blog…see peoples wonderful comments!
LikeLiked by 1 person
Mar 27, 2017 @ 18:11:02
I will do that… a treat for my creative soul 😍 Thank you
LikeLiked by 1 person
Mar 27, 2017 @ 18:19:28
Yes honey…food for the soul. My heart smiles when I get a wonderful comment. The best compliment is when I inspire someone.
LikeLike
Mar 27, 2017 @ 18:22:53
“‘_'”
LikeLike